It turns out more things are working than I initially thought.
For the benefit of anyone else having the same problem, I’ll describe exactly what I’ve done so far. I’m not saying it’s the best way, or that all steps are totally necessary, but this is exactly what I did and it worked for me. I also did it before reading the previous post.
This was on a Mac but probably exactly the same on windows.
.
.
Setting up Keylab Essential for Studio One
.
-
Connect your Keylab Essential to your Laptop/PC
-
Start “Midi Control Center”
-
Click “Device Settings” at the top right.
-
Change “DAW Mode” to “Mackie”
-
Click “Store To” (might not need to do this but I did it so saying exactly what I did)
-
Exit “Midi Control Center”
-
Start “Studio One”
-
On Mac, click “Studio One” then “Preferences” (on Windows “Studio One” then “Options”)
-
Click on “External Devices”
-
Click on “Add”
-
Click on “New Keyboard” (should be at the very top)
-
If you want, you can click on “Manufacturer” and enter Arturia,
then click on “Device Name” and type whatever you want to call your keyboard eg “Keylab Essential”
-
click on the pull-down box next to “Receive From” and select “KL Essential 49 mk3 MIDI)
Obviously if you have 61 or 88, select that, make sure to choose the one ending MIDI
-
Do exactly the same for “Send To” again making sure you’ve chosen the one ending MIDI
-
Click “OK” to close “Add Devices” then “OK” to close “Preferences”
.
Your keyboard should now be set up to play midi instruments etc, if you create an instrument track, your keyboard should happily play it.
.
Now to set up the transport controls
-
On Mac, click “Studio One” then “Preferences” (on Windows “Studio One” then “Options”)
-
Click on “External Devices”
-
Click on “Add”
-
Click on “Mackie” then “Control”
-
Click on the pull-down box next to “Receive From” and select “KL Essential 49 mk3 MCU/HUI)
Obviously if you have 61 or 88, select that, make sure to choose the one ending MCU/HUI
You don’t need to put anything under “Send To”
-
Click “OK” to close “Add Devices” then “OK” to close “Preferences”
-
VERY IMPORTANT On your Keylab Essential, hold the “Prog” button down and press Pad no 2
.
The display should now change to DAW (Note: Pressing “Prog” again by itself, takes it out of DAW mode.)
(When its NOT in DAW mode, play, stop etc still work, but other things don’t, please stay in DAW mode to try it out)
Everything below presumes you are in Daw Mode.
It’s best if you open a song with more than 8 tracks to test it.
.
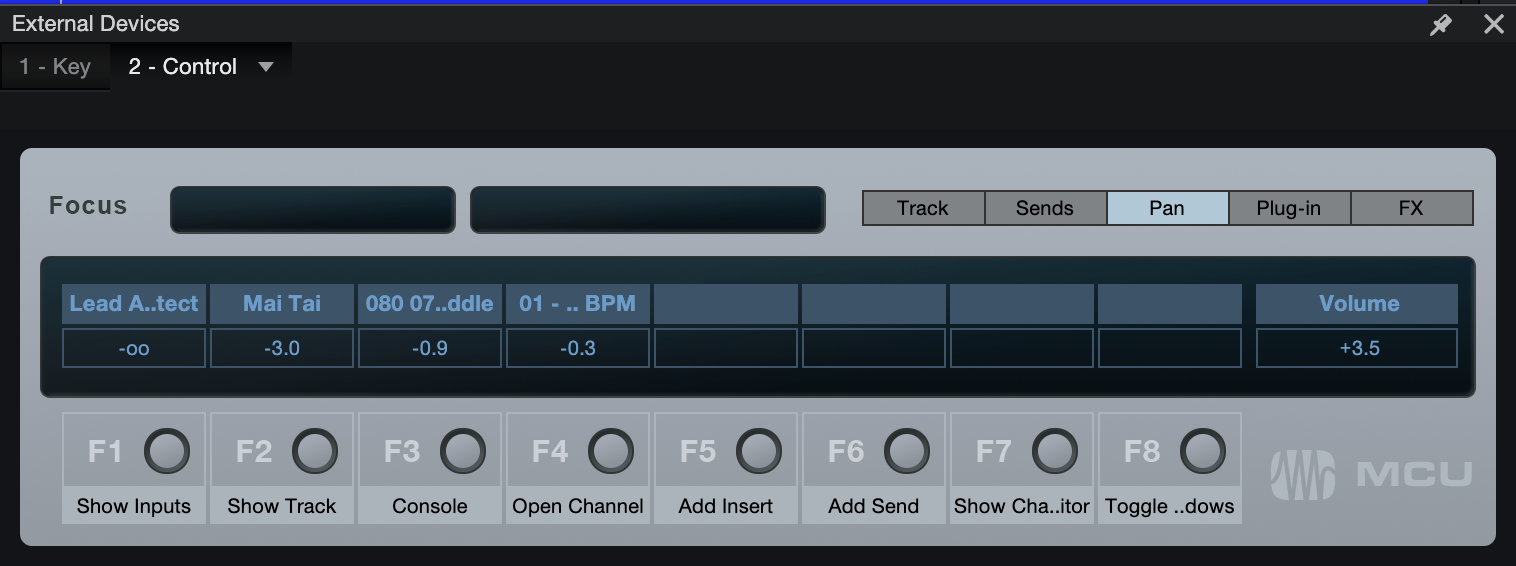
In the transport section, everything now works except for “Quant”, “Redo” “Metronome” and “Tap” (highlighted in yellow in the below pic)
.
.
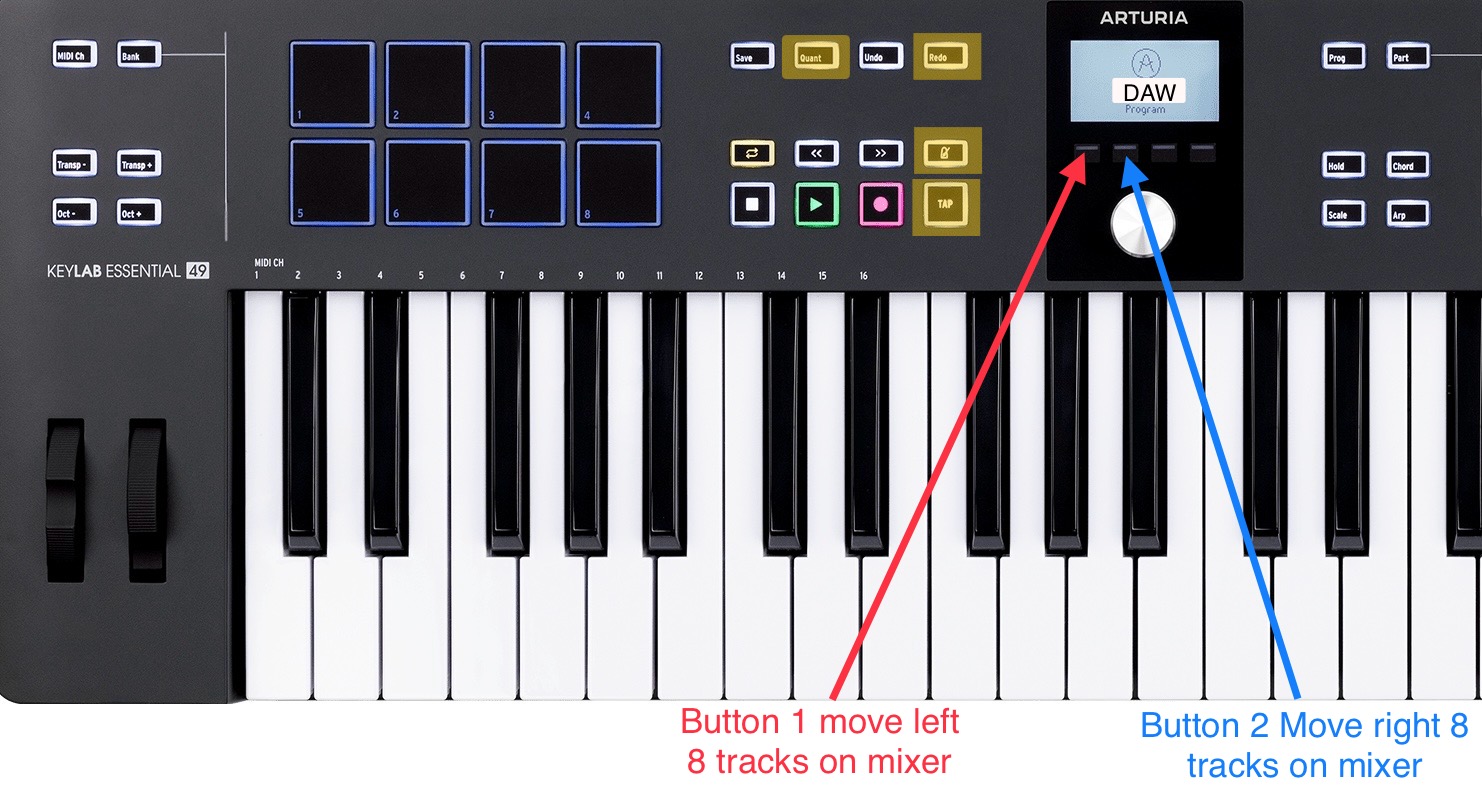
If you turn the big knob, it scrolls through your track, right by turning it clock wise, left, by turning it anti clockwise. If you press it, the track starts playing (pressing it again, doesn’t make it stop playing)
Make sure your mixer is displayed (F3) , the knobs 1 to 8 now control the “Pan” settings for the first 8 tracks.
The faders 1 to 8 now control the volume of the first 8 tracks.
Pressing the second button above the big knob (blue arrow in above pic) it jumps right to the next 8 tracks, so the knobs and faders 1 to 8 will now control tracks 9 - 16, press the button again and they control tracks 17 - 24 etc.
Pressing the first button (red arrow in above pic) above the big knob, it jumps left 8 tracks, so if you’ve pressed the second button and the knobs and faders are controlling tracks 9 - 16, pressing the 1st button will now make the knobs and faders control tracks 1 to 8.
Fader 9 controls the master volume.
So far I haven’t worked out what (if anything) , the 3rd and fourth button above the big knob do, and what knob no 9 does. I’m reluctant to use them for other things at the moment until I’m sure they aren’t assigned to anything.
.
Now to fix the “Quant”, “Redo” “Metronome” and “Tap” buttons.
.
It’s very very important to be in DAW mode
.
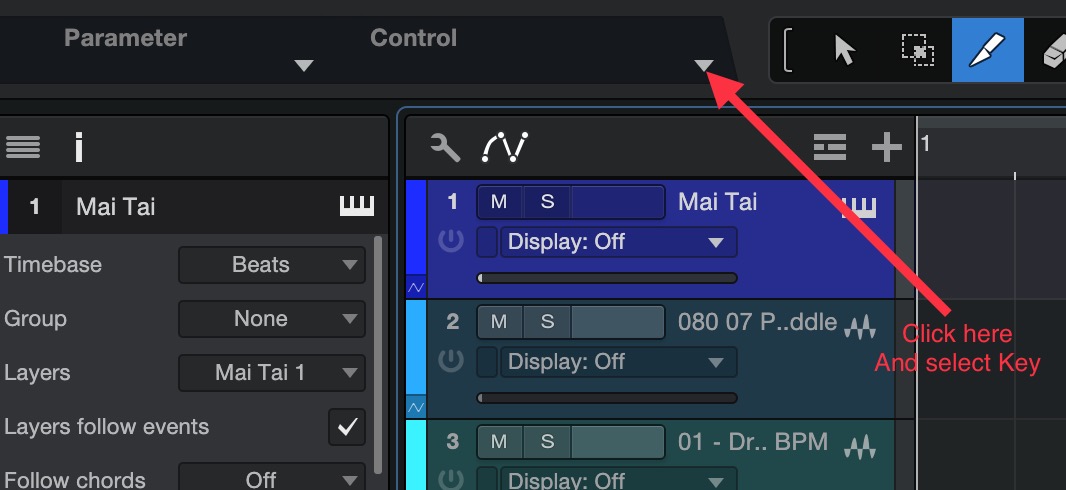
- At the top left hand of Studio One, click on the pull-down arrow as shown in the below pic and select “Key”, a window opens, if you clicked on “Control” by mistake, you can click on “Key” at the top left of this new window.
.
.
-
Now click “Midi Learn” and press “Quant” a knob should appear called “Control”, click where it says “Control” and change it to “Quantise” then right click on the knob and select “Button (on/off)”
-
Now it’s a button, right clicking gives you an extra option “Assign Command”, click on it, this brings up a “Select Command” window.
-
At the top of this window, type “quant”
-
A list of Quantize related things appear, click on “Quantize” under “Event”
Now the Quantize button works as expected
.
Do the same for the rest except for step 4 and 5
.
For “Redo”,
-
At the top of this window, type “redo”
-
click on “Redo” under “Edit”
.
For “Tap”
-
At the top of this window, type “tap”
-
click on “Tap Tempo” under “Transport
.
Unfortunately, I haven’t yet found a command to toggle the metronome on and off, there’s various metronome commands there, but not worked it out yet,
.
—————-
Note:
If you accidentally press a button that’s already in use, say you accidentally pressed “Save”, you can right click on the knob and select “remove” . If you select “Remove All” all buttons you have created will be removed and you will have to restart this bit
you can only rename, change knob/button type or remove a knob/button while Midi Learn is heightened. You can unassigned or reassign a different command whether Midi Learn is highlighted or not.
If you are not in the Keylab Essentials DAW mode, the knobs and sliders are available to control things like instrument parameters and Analog Labs
——————