Download Hex Fiend - due to forum limitations, I can only put 2 links in this post, but google hexfiend, it’s easy to find, and open source. Open that midi file in the editor.
Save the file with the name of your first patch with -LCD.mid at the end (eg “My-song-LCD.mid”, “Rhodes 1-LCD.mid”, whatever). The “-LCD” is not strictly necessary, but reminds you that all the midi file will do is set the LCD screen text.
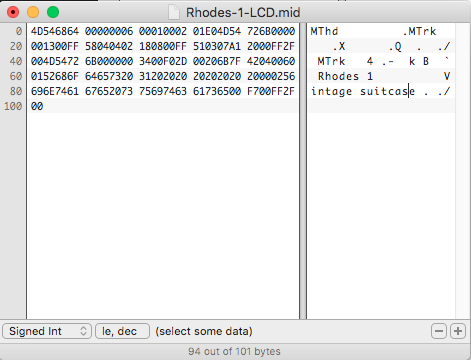
Carefully change the text “Line-1-goes-here” and “Line-2-goes-here” so that it contains your preferred text. You can’t delete characters, but you can replace them with spaces or any other letters / numbers you wish. If you have done this correctly, there should be 101 bytes in the file still. (bottom of the window). Then save it again.
Open your MainStage project, make sure your Keylab is connected, select the patch you want to add the LCD text setting to, and add an “External Midi” channel strip:
Click on the External Midi channel strip in the mixer.
In the External Instrument Channel Strip Inspector, select the “Midi Output” tab. It may be hidden under the >> on small screens
In the “on patch change” window, deselect everything except “Send MIDI file”, then click the “Select” button and select the MIDI file you saved in step 4.
Voilla! Your text should be displayed on the Keylab LCD.
Enjoy, and I hope that helps. It’s a small thing, but not having to keep looking at my laptop to know what patch is selected is really useful.
Thank you! This is exactly what i am looking for! However I need it for a KeyLab Mk3 61 and the suggestions here didn’t work (I was a little unsure on step 4 but I think I got it right). Can anyone help??
Note, above instructions work only for Keylab Mk2 (tested on 61, may work on others). Here’s how to do this for a Keylab MK3 61 and Mainstage. It may work on other Keylab MK3 keyboards.
and converted the sysex messages to midi files with SysEx librarian. You won’t need that to make this work. Above github link is amazing, and it shows you how to change a lot of other parameters (eg pad colours, LCD icons not included in this brief guide, etc). However, this should be enough for you to name your patches so that you can see them on the keyboard LCD when you change them - really useful for live performance.
You will need:
Mac running mainstage
Hex fiend. (Google it for the download, it is free. I can’t include a link here as I only get 2 links per post)
Set keyboard to “DAWs” mode.
Press the “prog” button on the keyboard until LCD displays “DAWs”. It will cycle through “DAWs”, “User” and “Arturia”
Using the above midi files (Dropbox link, download and unzip) as a template:
Start with the midi file that corresponds to the icon you want to use (they are all named something like “mk3-daw-ti2l-numbers-piano-xxx.mid” where “piano” identifies the icon used. For the very first patch in your session, you will need to use “mk3-daw-ti2l-numbers-init-daw-and-piano-007.mid” as it contains the “init daw” system message that is required for subsequent messages to work.
Edit the template file with Hex Fiend, change the numbers 123456789012 (line 1 text) and 12345678901234 (line 2 text) to the characters you want.
Edit carefully and save with a different file name. Your new file should have 100 bytes (or 115 if it’s the “init” message), and any numbers from line 1 and 2 that you don’t use should be replaced with spaces. Leave all the other parts of the file exactly as they are, in exactly the same positions, otherwise it won’t work. There are some “example” midi files in the above download so you can see how they should look after editing.
In Mainstage:
Add an external instrument channel strip
In the channel strip (with the fader), set midi output to “MIDI KL Essential 61 mk3”
Click the channel strip, and check “External Channel Strip Inspector” appears below the keyboards in the workspace
“Layer Editor” tab, ensure override parent ranges is set to “Add”
“Midi output” tab, check “send midi file” and select one of the files above.